Entries from July 2006 ↓
July 29th, 2006 — Mac, Software, Tips
Out of the blue, iMovie decided to stop working for me. I’d launch it, and it would immediately quit. Not crashing, just quitting. (No crash log was generated.) The dock icon wouldn’t even appear.
I knew it wasn’t a problem with the iMovie application itself because when I switched to another user account on the same machine, iMovie ran fine. It had to be something in my home directory that was causing the problem.
Normally, simply getting rid of any preferences or caches fixes this sort of problem. I checked my account and found these:
- ~/Library/iMovie/
- ~/Library/Caches/iMovie HD/
- ~/Library/Preferences/com.apple.iMovie.plist
- ~/Library/Preferences/com.apple.iMovie3.plist
Unfortunately, moving them out of my Library directory didn’t change a thing. iMovie was still quitting on launch. Frustrated, I took my PowerBook to the local Apple Store for some advice, but even the “genius†at the bar wasn’t able to help. I returned home thinking that I’d have to reinstall Mac OS X before iMovie would ever work again.
I decided to give iMovie one last try. On a whim, I dragged its icon out of the Applications folder and into my Desktop, then launched it from there. Imagine my shock when iMovie started up! I quit, moved the icon back to Applications, and launched iMovie again. It still worked! Everything was back to normal.

I have no idea why dragging iMovie out of the Applications folder solved the problem. In fact, it shouldn’t have worked. But it did. Assuming this is not some obscure and one-in-a-zillion issue, it may affect other Mac apps, not just iMovie, so I’m posting this tip in the hope that it might help others who encounter the same problem I did.
July 19th, 2006 — Gadgets, Software, Tips
TomTom Navigator 5 is a marvelous piece of software that can turn a PDA into a GPS navigation system. At $180, it’s somewhat expensive, but if you already have a PDA and get a cheap GPS receiver, you can end up saving hundreds of dollars over traditional stand-alone navigators.
For a few months now, I’ve been using it with my Treo 650, which means in addition to making calls, tracking finances, playing games, and surfing the web, my little smartphone keeps me from getting lost, too! I no longer have to ask for directions or look them up on the Internet; I just hop in the car, give Navigator an address, and it tells me exactly where to turn.
One of the more useful features in Navigator is that when you arrive at an interesting location, you can save your current GPS coordinates as a “Favorite.†You can then return to your Favorite at a later date without having to give Navigator an address. This feature is especially useful for remote locations that might not have an actual street address to begin with.
For instance, on a trip to South Dakota last week, my wife and I stayed at my parents’ cabin, which happens to be pretty deep in the woods, so I marked its location in Navigator as a Favorite. It wasn’t that I was worried about finding my way back; instead, I wanted to remember the coordinates of the cabin so that I could easily look them up in Google Earth when I returned home.
When I got back, I discovered that extracting those GPS coordinates was anything but easy. The Navigator 5 software won’t display the coordinates of a Favorite, and it doesn’t offer any documented way of uploading a Favorite to a computer. That meant I had to find an undocumented way.
After scouring numerous discussion boards and various websites, I finally cobbled together enough information on how to extract the GPS coordinates of a Favorite from TomTom Navigator 5. To save others from the trouble I went through, I’m posting a step-by-step guide below.
- Convert the Favorite into a Point of Interest (POI).
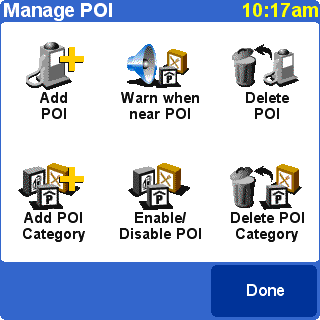
- Go to Change Preferences, then Manage POI, and choose Add POI Category.
- Type a name for the new Favorites category. (“Favorites†sounds like a good choice.)
- Choose a marker.
- Choose Add POI, then select the Favorites category.
- Choose Favorite and select the Favorite you want to convert to a POI.

- Transfer the POI file to your computer. The easiest way to do this is with the FileZ utility.
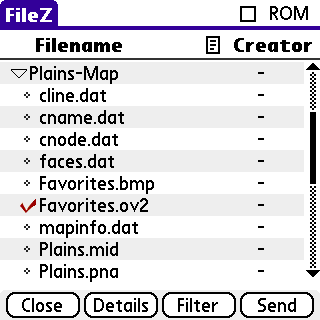
- Launch FileZ, then view the contents of the external card.
- There should be a directory there called region-Map, where region is the map you are currently using (e.g., “Plainsâ€).
- Open that directory by tapping on the little triangle.
- Look for a file ending with “OV2†and having the same name as the POI category you created in the previous step (e.g., “Favorites.ov2â€).
- Transfer this file to your computer. The easiest way to do this is to tap the file to select it, then tap the Send button and choose the Bluetooth option. This will shoot the file through the air onto your computer (assuming, of course, that your computer supports Bluetooth, as all good computers do). If not, you can choose the VersaMail option to email yourself the file, or use any other means at your disposal.

- Extract the contents of the POI file. The next step is to convert the OV2 file from its original binary form into something that mere mortals can read. The easiest way to do this is at the GPS Visualizer website, which provides a convenient front-end for the GPSBabel software.
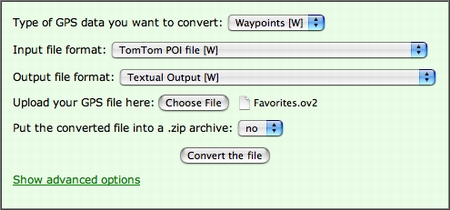
- Go to the GPSBabel section of the GPS Visualizer website.
- For the input file format, choose “TomTom POI fileâ€.
- For the output file format, choose “Textual Outputâ€.
- Select the file (e.g., Favorites.ov2) that you transferred to your computer in the previous step.
- Click the “Convert the file†button.

That’s it! You should now see a list of your Favorites. The first column is the name of the Favorite; the second and third columns are its longitude and latitude. (The fourth column in parentheses is the location in UTM coordinates.) For example:
Cabin  N44 58.663  W103 35.017  (12T 617600 4890373)
Now that you know the coordinates of your Favorite, you can use them any way you wish. For instance, you can copy and paste them directly into Google Earth’s search box, and it will immediately fly you there.

July 17th, 2006 — Personal
For our summer vacation, Yaa and I spent five days in the Black Hills for a family reunion. This was Yaa’s first time ever in that part of the country, and my first time in the last fifteen years, so it was quite an experience for both of us. Most of our time was spent in a fantastic two-story cabin in the middle of the woods that my parents had recently purchased.

From this “base camp,†we journeyed to Mount Rushmore, Crazy Horse, and a number of tourist traps in Hill City.

We spent one of our days at Sylvan Lake, where we hiked and rented a couple of paddleboats.

Later, I climbed Harney Peak, where I saw a mountain goat, a rainbow, and the old lookout tower that was used decades ago to watch for forest fires.

And before the trip was over, Yaa had made a new friend.

July 7th, 2006 — Software
Job hunting isn’t easy. Even in this technological age, the simple task of applying for a job online can be a time-killing chore. Companies often require applicants to apply via their website, and the process usually goes something like this:
- Type your first name
- Go to the next field
- Type your last name
- Go to the next field
- Type your street address
- Go to the next field
And so on and so on until you’ve painstakingly entered all the little bits of data from your résumé: employment history, references, skill set, and more. And that’s only for one company. If you want to apply somewhere else, you have to go through the process all over again!
It shouldn’t be this difficult. Just about everyone stores their résumé in an electronic format these days, so why can’t we simply upload the file to our potential employer? That would certainly make life easier for applicants, but employers would rather not have to support a dozen different file formats. Microsoft Word, for instance, comes in several different flavors, and when Word 2007 comes out next year, yet another file format will have to be dealt with.
One way to handle this issue is to require applicants to use a standard, open file format such as HTML or PDF. But that still doesn’t solve everything: Even with a standard file format, applicants make hundreds of different cosmetic choices for their résumés: Some put their education history near the beginning; others put it at the very end. Some might say they have a “Master of Science†degree while others just say they have an “MSâ€.
Human beings can handle these variations, but computers have a tough time processing them. And companies love to use computers to find applicants. They want to make queries like, “Show me all applicants with a master’s degree†or “How many applicants can write Java software?†But with all those variations, computers can easily get confused. They might think “MS†means “Mississippi†or that a person who was born on an island in Indonesia is actually skilled in a certain programming language.
What we really need, then, is some kind of special file format. Something that strips away all the layout and formatting of a résumé, leaving only the raw content. Each piece of data in the résumé could then be tagged with its meaning. A computer examining the data would be able to say, “Ah-ha, this is a graduation date,†or “I see, this is the name of a reference,†without even breaking a sweat. (Yes, I know computers don’t sweat. I like to anthropomorphize, okay?)
Luckily, this special file format already exists. It’s called HR-XML. Based on the popular XML format, it’s designed so that human resources departments have a common standard for storing and exchanging information about applicants.
But it’s not just for HR departments. Applicants can benefit, too. Instead of keeping track of different versions of the same résumé (say, an HTML version for posting to the web, a plain text one for sending via email, and perhaps a Word version for printing), you can store everything in a single “master†copy in HR-XML format. You can then let the computer automatically generate the version you want. And although HR-XML loses all of the beautiful fonts and formatting you may have created for your résumé, you can tell the computer how to add the cosmetic stuff when it generates an HTML or PDF version for you.
So…how does one accomplish all these tricks? One way is with the HR-XSL project, a collection of open-source software that helps job applicants take advantage of the HR-XML format. It was started on SourceForge back in 2002, but the original developer never quite got the project off the ground and abandoned it in 2003. I took over as administrator of HR-XSL a couple of months ago and did almost a complete rewrite of the code, releasing a new version yesterday with tons of new features and improvements on old ones. Check it out and let me know what you think.
Today, HR-XML is popular with human resources departments, but so far it hasn’t really caught on anywhere else. There are no major companies or job sites that accept résumés in the HR-XML format. Hopefully, with help from projects like HR-XSL, this will soon change.
![]()


