When adding a folder to an Xcode project, you can add it as a group or as a reference.
What’s the difference, and why would you choose one over the other? Each has advantages and disadvantages, some of which are quite subtle.
Groups
With groups, Xcode stores in the project a reference to each individual file. This can lead to problems:
The size and complexity of the underlying project file (project.pbxproj) can grow significantly, especially with multiple targets. Each new target has to duplicate all of the references. You also have to remember to set the proper target membership for each file. Plus there is a greater likelihood of SCM merge conflicts due to the larger and more complex project file.
Groups may bear no resemblance at all to the folder hierarchy on disk. You can have project folders in the Finder that don’t even exist in the Xcode project, and vice versa. Because of the mismatch, locating files can get confusing.
If you move a file or rename it outside of Xcode, the reference breaks and the file turns red. File management becomes a real pain.
In exchange for these annoyances, groups give you some advantages:
You can pick and choose which files on disk you want to appear in the project. There may be auxiliary files such as documentation that you don’t want to appear in the Xcode Project Navigator.
You get fine-grained control over target membership. You can, for example, exclude a single file from a target.
When building the product, Xcode flattens the group hierarchy and dumps all the files in the top level of the product’s bundle. You don’t have to specify the location in the hierarchy. For example, instead of:
[UIImage imageNamed:@"Images/Icons/GoPago"];
you can just do:
[UIImage imageNamed:@"GoPago"];
But this does mean you have to resolve conflicts if two images happen to share the same name.
Folder References
Folder references are simpler. You can spot a folder reference because it shows up in blue instead of yellow.
The benefits of folder references are:
Xcode only stores a reference to the folder. All of its files and subfolders are automatically added to the project. This keeps the project file smaller and simpler, with less chance of merge conflicts.
If you rename, delete, or move a file in the file system, Xcode automatically updates the folder reference to reflect the change. File management is thus far easier.
Because the folder hierarchy in the project matches the hierarchy on disk, they will not diverge over time and cause confusion.
You don’t have to worry about name conflicts because the directory structure is preserved in the product bundle. Two files can share the same name as long as they live in different directories.
So why don’t we always use folder references?
Target membership is coarse-grained. Either all of the files in the folder are in the target, or none are. (On the other hand, if you actually want all files in the folder to have membership, this could be more of a pro than a con.)
There is no way to hide individual files from the project navigator. Either they all appear or none do. (Again, this could in fact be an advantage because there’s no way for a file in the folder reference to be accidentally left out of the project.)
When loading a resource, you must specify the full path. Instead of:
[UIImage imageNamed:@"GoPago"];
you must do:
[UIImage imageNamed:@"Images/Icons/GoPago"];
And if you change the file’s location on disk, you must remember to update the code.
An image stored as a folder reference will not work with Interface Builder! When editing, IB is able to find the image file and allows you to select it, but when it generates the XIB, it strips the folder location, which prevents it from being found. The result is a blank image and a runtime error:
Could not load the "MyImage.png" image referenced from a nib in the bundle with identifier "com.mytest.MyProject"
Conclusion
The fact that Interface Builder can’t work with images in (sub)folder references is a dealbreaker. And being able to select the target membership for individual files””a feature only provided by groups””can be very useful. For these reasons, you will find that groups are far more common in practice, and it is the option I recommend. You just have to live with the fact that if you move the files around on disk, you’ll have to manually update the Xcode project to match.
That said, it’s unfortunate that Xcode doesn’t offer better support for folder references. I wish I could use them more often, as I hate having to keep my project view in sync with the filesystem, but the IB problem keeps me away. And I almost never need groups, since my projects typically have only one target, and pretty much everything in my project folder gets bundled into the product. Maybe one day Apple will fix the IB bug and my wish can come true.
When deadlines loom, even skilled and experienced programmers can get a little sloppy. The pressure to ship may cause them to cut corners and look for a quick and easy solution, even if that solution is sure to cause trouble later on. Eventually, their coding style devolves into copy and paste programming, a lamentable tactic that involves cherry-picking snippets of code from a past project and putting them to use in the current one. Of course, the proper solution is to factor out the code into some kind of reusable library, but due to time constraints, it’s simply duplicated wherever it’s needed. Any bugs in the original code have now spread to a dozen different places in a dozen different projects. It’s an algorithm for chaos.
Yet in the world of iPhone applications, copy and paste programming seems to be disturbingly common. The fact that so many iPhone apps are short-term, one-off projects doesn’t help, but the situation has been aggravated even more by Apple’s security restrictions. In particular, dynamic linking to any shared library that doesn’t ship with the OS is strictly forbidden. One could argue that this rule is a necessary side-effect of the iPhone’s sandboxing security model, but even workarounds such as consolidating code into a static shared library are extraordinarily difficult. Another contributing factor is that the iPhone API is still relatively immature, and developers too often require custom code to fill in its gaps.
This situation has transformed more than a few iPhone programmers into copy and paste programmers. When they inevitably encounter some limitation with the iPhone API, the typical response is:
Now imagine what happens when a thousand iPhone developers find the same snippet. Suddenly the problems of copy and paste programming have gone global. Offline, a bug in a single snippet of code may infect a dozen projects; online, it can spread to thousands.
As a reluctant copy and paste iPhone programmer myself, I’ve witnessed this scenario first-hand. I recently encountered a limitation with a certain iPhone class—UIImage—and I found in a discussion forum what seemed to be a popular, well-regarded solution. The code snippet was the first hit in a Google search, and many readers had replied with thanks to its author. However, a bit of testing showed that it worked for most images but completely failed for others. By the time I stumbled upon it, the buggy code had probably spread to countless programs already.
In the process of finding the bug and posting the fix, I ended up writing a substantial amount of additional code to address various other annoyances related to UIImage. The complete listing is available for download below. Though it won’t solve the copy and paste problem, it should be a welcome remedy for other iPhone developers who have run into similar obstacles.
Background
Programming for the iPhone, a highly graphical device, necessarily involves a substantial amount of image manipulation. Its SDK therefore provides an abstraction called UIImage that handles much of the effort in importing and drawing images. For example, imagine you want to load a JPEG file, scale it down to icon size, and give it rounded corners. These tasks may require tens or even hundreds of lines of code on other platforms, but on the iPhone, it’s only a matter of instantiating a UIImage, passing it to a UIImageView of the appropriate size, and setting the cornerRadius property.
Despite its ease of use, or perhaps because of it, UIImage suffers from some serious limitations. Key among these is its lack of support for resizing the image, a feature that is normally handled dynamically by its companion, the UIImageView component. However, should an iPhone application need to reduce the size of an image for storage or for exchange with an external entity (such as a web server), the UIImage class is insufficient.
Of course, UIImage is not the only means of image manipulation on the iPhone. It ships with a rather sophisticated graphics API, known as Quartz 2D, that offers low-level control of bitmap data. Clearly, the functionality for resizing an image exists, although taking advantage of it is not straightforward and requires the developer to write non-trivial code. How best to accomplish this task has been the source of much confusion and debate, particularly in forums such as iPhone Dev SDK:
This is crazy. I know there are threads that touch on this already, but none of them have led me to the answer. I can’t believe that it is really this difficult!
I have done lots of searching for a way to resize images via the iPhone SDK and I have come across a few methods which work but the resulting image does not look nearly as good as if you took the full resolution image and told it to draw inside a rectangle.
These discussions have resulted in countless code snippets that claim to resize a UIImage, but many of them contain bugs, or they simply leave out functionality such as EXIF orientation support, an absolute necessity when dealing with photographs taken by the iPhone’s camera. For instance, a particularly popular code snippet for UIImage resizing incorrectly processes alpha information, resulting in a pink tint for certain image files.
Image resized correctly
Image resized with buggy code
A Better Way to Resize Images
The following sections describe yet another collection of source code for resizing UIImage objects. Functionally, it is similar to code samples that can be found elsewhere on the Internet in discussion forums and blogs, but it consolidates their features into a self-contained, reusable package and offers several notable improvements:
Additional methods for cropping images, generating thumbnails, and more.
Implemented as Objective-C categories to facilitate reuse. With categories, you can simply plop the code into your project, import a header file, and all of your UIImage objects will automatically have access to the new methods.
Bugs that commonly plague other code of this type have been found and fixed. The categories have been vetted in a large, real-world iPhone app, and they contain no known bugs.
The code has been simplified as much as possible and is more thoroughly documented.
The source code to the categories can be downloaded from the links below or as a single archive. If you are an experienced iPhone programmer, you can probably grab the files and start using them right away. Continue reading for more detail on how to apply them, as well as a run-down of the problems that prompted their creation.
Extends the UIImage class with helper methods for working with alpha layers (transparencies).
UIImage+Alpha
The Alpha category is perhaps not as directly useful as the others, though it provides some necessary functionality that they build upon. Its methods include:
- (BOOL)hasAlpha;
Tells whether the image has an alpha layer.
- (UIImage *)imageWithAlpha;
Returns a copy of the image, adding an alpha channel if it doesn’t already have one. An alpha is required when adding transparent regions (e.g., rounded corners) to an image. It may also be necessary when loading certain kinds of image files that are not directly supported by Quartz 2D. For example, if you load a JPEG using imageNamed:, the resulting UIImage will have 32 bits per pixel with the first 8 bits unused (kCGImageAlphaNoneSkipFirst). But if you take the same image and save it in BMP format, and load it exactly the same way, the UIImage will have 24 bits per pixel (kCGImageAlphaNone), which is unsupported in Quartz 2D. Trying to render it to a graphics context will cause run-time errors. The obvious way around this problem is to make sure you only load image files that produce a Quartz-compatible pixel format. (A complete list is available in the Supported Pixel Formats section of the Quartz 2D Programming Guide.) If for some reason this is not possible, adding an alpha channel to the UIImage at runtime may also work.
Returns a copy of the image with a transparent border of the given size added around its edges. This solves a special problem that occurs when rotating a UIImageView using Core Animation: Its borders look incredibly ugly. There’s simply no antialiasing around the view’s edges. Luckily, adding a one-pixel transparent border around the image fixes the problem. The extra border moves the visible edges of the image to the inside, and because Core Animation interpolates all inner pixels during rotation, the image’s borders will magically become antialiased. This trick also works for rotating a UIButton that has a custom image. The following before-and-after video shows the technique in action. (The top square is the original image; the bottom square has a one-pixel transparent border.)
UIImage+RoundedCorner
With the release of iPhone OS 3.0, a new Core Animation feature called cornerRadius became available. When applied to a layer, it makes the corners soft and round, just the thing for achieving a Web 2.0 or Mac OS X look-and-feel. For example, if you have a UIButton with a custom image like this:
The fun stops there. The cornerRadius setting only affects the run-time appearance of the layer. As soon as you save the image or send it over the network, the rounded corners go away. Also, if you animate the layer, perhaps by making it rotate, the cornerRadius property mysteriously reverts to zero, giving the image sharp corners again. This is a confirmed bug (#7235852) in iPhone OS 3.0 and 3.1.
To fix this problem, the RoundedCorner category can apply rounded corners to a UIImage permanently. It modifies the image data itself, adding an alpha layer if necessary. Not only does this work around the Core Animation bug, it also preserves the rounded corner effect when exporting the UIImage to a file or network stream, assuming that the output format supports transparency.
Creates a copy of the image, adding rounded corners of the specified radius. If borderSize is non-zero, a transparent border of the given size will also be added. (The primary purpose of this parameter is to work around the aforementioned aliasing problem that occurs when rotating an image view.) The implementation is based on code by Björn Sållarp.
UIImage+Resize
Resizing a UIImage is more complicated than it may seem. First, there’s simply the matter of learning Quartz 2D—a somewhat complex, low-level API. A mistake in a single parameter can suddenly affect thousands of pixels, yielding unexpected results like the pink tint problem shown previously.
Another issue to consider is the quality of the resulting image. By default, Quartz 2D applies a fast but not-so-high-quality interpolation algorithm when scaling images up or down. The effect is especially noticeable when reducing an image to a very small size, perhaps for an icon or thumbnail representation. The aliasing caused by the algorithm transforms smooth lines into jagged edges. Faces become a pixelated mess.
To illustrate, the following image is the result of squeezing a 1024×516-pixel JPEG (courtesy of PD Photo) into a 320×200-pixel UIImageView with automatic resizing enabled:
Note the serrated edges along the wings. To counteract the unsightliness, Quartz 2D can be configured for a different scaling algorithm by calling CGContextSetInterpolationQuality. Here is the same image, pre-scaled using the kCGInterpolationHigh option, and displayed in the same UIImageView:
The jaggies are now gone, replaced with smoother, cleaner lines.
Yet another obstacle, one of particular importance to iPhone developers, is image orientation. When a user takes a snapshot with the iPhone’s camera, the image is not upright but is in fact rotated 90 degrees counterclockwise. The reason is because the iPhone’s camera is positioned in a way that makes up (from the lens’s perspective) point to the left-hand side of the camera. The iPhone’s camera software knows this and therefore adds a special flag to the image data that indicates how the pixels should be rotated to produce the correct orientation. The software employs the same tactic when the user takes a picture in landscape mode (i.e., holding the phone sideways). It can rotate the image without having to apply a transformation across millions of pixels. Instead, it simply changes the orientation flag. Components such as UIImageView automatically read this flag—stored in the imageOrientation property of UIImage—and apply the proper rotation at run-time when displaying the image.
Unfortunately, as soon as you dip into the low-level Quartz 2D API, which has no knowledge of the high-level UIImage class, the orientation information is lost. An image resize algorithm written using this API will need to be provided with the orientation and perform the rotation explicitly.
The Resize category solves each of these problems while incorporating additional handy features. Its methods include:
- (UIImage *)croppedImage:(CGRect)bounds;
Returns a copy of the image that is cropped to the given bounds. The bounds will be adjusted using CGRectIntegral, meaning that any fractional values will be converted to integers.
Returns a copy of the image reduced to the given thumbnail dimensions. If the image has a non-square aspect ratio, the longer portion will be cropped. If borderSize is non-zero, a transparent border of the given size will also be added. (The primary purpose of this parameter is to work around the aforementioned aliasing problem that occurs when rotating an image view.) Finally, the quality parameter determines the amount of antialiasing to perform when scaling the image.
Returns a resized copy of the image. The quality parameter determines the amount of antialiasing to perform when scaling the image. Note that the image will be scaled disproportionately if necessary to fit the specified bounds. In other words, the aspect ratio is not preserved.
This method, as well as all other methods described here that perform resizing, takes into account the orientation of the UIImage and transforms the pixels accordingly. The resulting image’s orientation will be up (UIImageOrientationUp), regardless of the current orientation value. The code to perform this transformation is based in part on the following sources:
UIImageView offers a remarkably helpful ability: It can resize displayed images while preserving their aspect ratio. The manner of preservation depends on a setting known as the content mode. For example, if a large JPEG (courtesy of PD Photo) is displayed in a small view with the content mode set to Center (UIViewContentModeCenter), only a portion of the image is visible:
To include the entire image, the view’s content can be scaled to fit within the bounds (UIViewContentModeScaleToFill). Note that Scale To Fill does not preserve the aspect ratio, resulting in a squashed image:
To scale the image without changing the aspect ratio, one option is to shrink the content until it fits entirely within the bounds (UIViewContentModeScaleAspectFit). Although this option shows the full image, it has the side-effect of not filling the entire view:
(Note that any area not covered by the image in Aspect Fill mode is actually transparent. It’s colored gray here to show the view boundary.)
Another aspect-preserving option is to shrink the content just enough to fit the smaller dimension within the view. The larger dimension (in this case, the length) will be cropped:
The correct choice of content mode depends, of course, on the desired appearance and the nature of the source image.
Because these modes are so useful, equivalent functionality has been rolled into the Resize category. Scale To Fill is the default behavior of resizedImage:interpolationQuality:, while resizedImageWithContentMode: supports both Aspect Fit and Aspect Fill. (Other content modes, such as Left and Bottom Right, were left unimplemented because they are rarely used.)
License
All code presented here is free for both personal and commercial use, with or without modification. No warranty is expressed or implied.
When I’m at home, my MacBook Pro is hooked up to an external display, a couple of hard drives, and other peripherals. When I need to go on the road, I put it to sleep, unplug all the peripherals, and away I go.
There’s only one problem: Unplugging a hard drive can corrupt its filesystem if it’s still mounted. To prevent that from happening, I wrote a script that automatically unmounts all drives. As an added bonus, the script fails if any of those drives are busy and can’t be unmounted, warning me to take additional action before hitting the road. Here it is:
tell application “Finder”
eject (every disk whose ejectable is true)
end tell
In most cases, this simple script works great, but it suffers from a few drawbacks:
It ejects not only hard drives, but optical discs as well, which is usually not what I want.
It won’t eject remotely mounted drives, such as NFS or AFP mounts.
It won’t work if Finder is not running, which may be the case for PathFinder users like myself.
To fix these issues, I split the script into two parts, one for local drives and one for remote drives, and I rewrote it so that optical discs would be left alone. Here’s the part that unmounts local drives:
-- Set this list to the names of the local drives
-- you want to unmount
set local_drives to [“Backup drive”, “Clone”]
repeat with drive in local_drives
set drive to “/Volumes/” & drive
set driveExists to false
try -- Ignore AppleScript warnings
do shell script “test -d ” & ¬
quoted form of drive
-- Test completed successfully; drive exists
set driveExists to true
end try
if driveExists then
-- Eject the drive
do shell script "umount " & ¬
quoted form of drive
end if
end repeat
And here’s the part that unmounts the remote drives:
-- Set this list to the names of the remote drives
-- you want to unmount
set remote_drives to [“DreamHost”, “DOC”]
repeat with drive in remote_drives
set drive to “/Volumes/” & drive
do shell script “umount ” & ¬
quoted form of drive
end repeat
I don’t eject optical drives, but if for some reason you need to do so, here’s how:
-- This will eject the optical disc in the
-- primary (built-in) drive
do shell script “drutil -drive 1 eject”
-- This will eject all discs in all optical drives
do shell script “drutil eject”
Apparently the developers at 1 Infinite Loop like to keep their code cheerful. An example posted to the Apple Developer Connection uses bunnies—yes, cute little bunnies—to demonstrate the power of frame buffer objects in OpenGL.
If you have a Mac, go ahead and download the example. Run it, then hit the Spacebar. You’ll see some very trippy effects that remind me of Dumbo’s pink elephant hallucination.
The frame buffer object, in case you were wondering, is a relatively new feature in OpenGL. It provides hardware-accelerated offscreen rendering of a texture. FBOs improve upon the older pixel buffer (PBuffer) technique, which was basically the same but required an evil context switch that hindered performance.
Inspired by a recent MacRumors article about a Japanese version of the “Get a Mac” campaign, I wondered how many foreign-language ads Apple had made. I found five:
Unfortunately, the Japanese version is the only one with actors other than John Hodgman and Justin Long. The rest are simply dubbed.Still, if I had to choose anyone to replace John and Justin, it would be these guys.
My computer upgrade cycle is 2.5 years. That’s about how long it takes for technology to improve to the point where new computers, with their faster chips, bigger hard drives, and more RAM, make the upgrade cost worthwhile. And since I’ve had my PowerBook since April 2004 (about 2.5 years ago), I’ve really been itching to upgrade.
My eye has been on the MacBook Pro, but with Intel’s announcement of the Core 2 Duo chip, I knew an upgrade of Apple’s flagship portable was imminent. I decided to put off my purchase until the very day the Core 2 Duo MacBook Pro was announced.
So I waited. And I waited. And I waited some more. While I was waiting, I saw countless news stories of PC manufacturers announcing Core 2 Duo laptops. But Apple? They were silent. During this time, my PowerBook felt as if it were getting slower and slower and slower.
And then, one day in September, my PowerBook got really slow. In fact, it stopped. Completely. Something had gone horribly wrong with the main logic board, and I had to send it to Apple Support for repair. I didn’t want to be without a computer for the next 7 to 10 days, and I certainly didn’t want to wait who-knows-how-long for Apple to announce a Core 2 Duo laptop. So I bit the bullet, walked into an AppleStore, and walked out with a brand new 15-inch MacBook Pro.
After upgrading the RAM from 512MB to 1.5GB (almost a necessity with Mac OS X) and upgrading the hard drive from 80GB to 120GB (did the upgrade myself, aided by Other World Computing’s instructional video), I ended up with a pretty smokin’ fast laptop. How fast is it?
It’s so fast, it finishes compiling my code before I type it.
It’s so fast, it requires two halt instructions to stop it.
It’s so fast, it executes an infinite loop in six seconds.
(Ah, the oldies but goodies. I love computer jokes.)
Of course, the true measure of a computer’s speed is BZFlag. My new MacBook Pro is so fast I can pump up all the detail settings to the max, and the game still runs smoothly. That was impossible on my old PowerBook. In fact, I didn’t quite realize how much I was suffering with my PowerBook’s aging G4 processor until I saw a Geek Patrol article that chronicled Mac performance through the years. Their graph clearly shows the huge jump in speed that Apple is getting by moving their laptops to Intel processors, not to mention how severely the G4 has stagnated in recent years.
But speed isn’t the only thing I’m getting with my new MacBook Pro. It includes some nice bonus features, too:
Nifty remote for listening to music and watching DVDs
Backlit keyboard for low-light situations (airplanes, midnight snacks, etc.)
Built-in iSight video camera
Full-size DVI port
(My old PowerBook had a mini-DVI port, so I had to remember to bring an adapter whenever I was to give a presentation. Very annoying.)
One final note: My new MacBook Pro has a 15“ display, pleasantly roomier than my old 12” PowerBook. Web surfing, coding, and almost everything else I do is more comfortable with the increased screen real estate. Of course, that also makes the laptop itself much wider and thus a bit harder to squeeze into a carry-on bag. Still, it’s thinner than my old PowerBook and only one pound heavier. It could always be worse.
My colleagues and I were finally able to publish our Autonet research at a conference in Chicago. Being the lead author, I hopped on a flight to the Windy City last Tuesday to present the results of our work. When I arrived at the hotel, I met the other two speakers scheduled for the afternoon session. The first one was busy setting up his Dell at the podium while the audience slowly began to fill the room. The second speaker had no laptop, only a USB drive with his slides; he was hoping to borrow the first speaker’s Dell.
We were about two minutes away from showtime when the projection screen suddenly froze. Here’s what everyone in the audience saw:
It turned out that the guy’s Dell was crashing whenever he tried to start his PowerPoint presentation. Rebooting didn’t help. Windows insisted on giving him the Blue Screen of Death.
By this time, we were now late. Frustrated, the two speakers saw me typing on my Mac and asked if I could help. I walked up to the podium, plugged my Mac into the projector, loaded both of their presentations into Keynote, and returned to my seat. The first speaker then began his presentation using my PowerBook. Then the second speaker. Then me.
No BSoD. No crashing. It just worked. My Mac saved the day!
Out of the blue, iMovie decided to stop working for me. I’d launch it, and it would immediately quit. Not crashing, just quitting. (No crash log was generated.) The dock icon wouldn’t even appear.
I knew it wasn’t a problem with the iMovie application itself because when I switched to another user account on the same machine, iMovie ran fine. It had to be something in my home directory that was causing the problem.
Normally, simply getting rid of any preferences or caches fixes this sort of problem. I checked my account and found these:
~/Library/iMovie/
~/Library/Caches/iMovie HD/
~/Library/Preferences/com.apple.iMovie.plist
~/Library/Preferences/com.apple.iMovie3.plist
Unfortunately, moving them out of my Library directory didn’t change a thing. iMovie was still quitting on launch. Frustrated, I took my PowerBook to the local Apple Store for some advice, but even the “genius” at the bar wasn’t able to help. I returned home thinking that I’d have to reinstall Mac OS X before iMovie would ever work again.
I decided to give iMovie one last try. On a whim, I dragged its icon out of the Applications folder and into my Desktop, then launched it from there. Imagine my shock when iMovie started up! I quit, moved the icon back to Applications, and launched iMovie again. It still worked! Everything was back to normal.
I have no idea why dragging iMovie out of the Applications folder solved the problem. In fact, it shouldn’t have worked. But it did. Assuming this is not some obscure and one-in-a-zillion issue, it may affect other Mac apps, not just iMovie, so I’m posting this tip in the hope that it might help others who encounter the same problem I did.
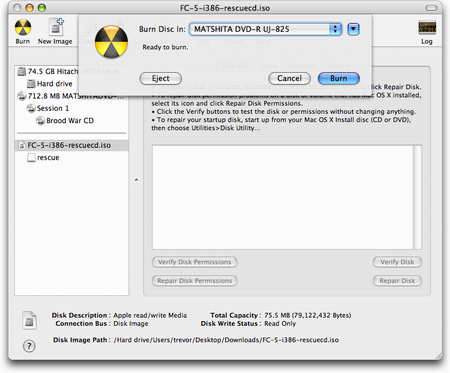
Disc images are a fairly common packaging standard for large software programs. If you want to try out a new Linux distribution, for example, chances are you’ll need to download a disc image in ISO format and burn it to a blank CD-ROM or DVD.
But ever since I began using Mac OS X, I’ve been perpetually confused about how to burn ISO images. I’m used to disc burning utilities that have an obvious, explicit command like “Burn ISO Image to CD”. To make life even more confusing, OS X’s Disk Utility does have a Burn command, but it becomes disabled when you click on a disc you want to burn to.
The problem here is that most Mac disc utilities, including the built-in Disk Utility, take a different approach when it comes to image burning. Instead of telling the program you want to burn an image, then choosing the file, you’re supposed to do the reverse: You choose the file, then tell the program you want to burn it.
So, to burn an ISO image to disc, here’s what to do:
Insert a blank disc.
Start Disk Utility.
From the File menu, choose Open Disk Image and select the ISO to be burned.
In the list of volumes, you will now see an item representing the ISO file. Select it.
Click the Burn button and follow the instructions.
That’s it! Sure, it may seem simple enough, but when you’ve been using Linux and Windows utilities for years, these steps can be a little perplexing and hard to remember.
UPDATE (6/22): This tip has been published on Mac OS X Hints.
Another slightly mystifying scenario is when you want to make a backup of a disc. Games, for instance, often require you to keep the original disc in your computer as a form of copy protection. Unfortunately, getting the disc out of its case every time you want to play can scratch it up. And of course, it’s simply inconvenient.
Wouldn’t it be great if you could copy an image of the disc to your hard drive, then somehow trick the game into thinking that the disc is inserted when it isn’t? Well, OS X can do that for you, but the steps aren’t obvious. Disk Utility requires you to make a number of choices: Do you copy from the CD volume, its session, or the drive itself? Do you create a “CD/DVD master” or a “read/write” image? To clear things up, here are the exact steps to create a perfect image of a disc:
Insert the disc.
Start Disk Utility.
You will see that three items have appeared in the list of volumes: The drive itself, one or more sessions, and the contents of the CD. Select one of the sessions.
Click the New Image button.
For Image Format, make sure “Compressed” is selected. Leave Encryption as “none”. Click Save.
Disk Utility will then create a Disk Image (DMG) file for you. When the process is finished, you can eject the disc, then mount the image by double-clicking it. Ta-da! All programs will now think the image is the real McCoy, and you can put the true disc into storage for safekeeping.
Gautam Rao, the “Playful Painter,” has produced a series of oil-on-masonite paintings of the Macintosh experience. I present two of them here, along with the pixels that Rao used as his source material.


